tomcat源码分析(一)
摘要
在web开发过程中tomcat是一款使用率非常高的软件,tomcat作用apache顶级项目之一,采用了多种精巧的设计模式,学习优秀的代码实践有助于提升自己的代码质量。这篇文章在说明 Server 和 Service 的启动过程中,介绍了类加载器的双亲委派机制,监听器和模板方法两种设计模式,供大家一起学习。
实验步骤
tomcat 使用ant进行构建,为了便于分析使用maven管理依赖。首先使用git 拉取代码,其次导入eclipse。笔者使用jdk版本为:openjdk 11
git clone https://gitee.com/jiajinliu/tomcat70.gitEclipse 中,找到 org.apache.catalina.startup.Bootstrap 类。 在 main 方法中设置断点。启动 Tomcat 并进入调试模式。
类加载器的使用
tomcat在启动过程中,Catalina对象其这重要的作用,Catalina负责加载service.xml文件,启动Service。下面的代码展示了Catalina对象的创建过程。
    Class<?> startupClass =catalinaLoader.loadClass("org.apache.catalina.startup.Catalina");
    Object startupInstance = startupClass.newInstance();

    // Set the shared extensions class loader
    if (log.isDebugEnabled())
        log.debug("Setting startup class properties");
    String methodName = "setParentClassLoader";
    Class<?> paramTypes[] = new Class[1];
    paramTypes[0] = Class.forName("java.lang.ClassLoader");
    Object paramValues[] = new Object[1];
    paramValues[0] = sharedLoader;
    Method method =
        startupInstance.getClass().getMethod(methodName, paramTypes);
    method.invoke(startupInstance, paramValues);

    catalinaDaemon = startupInstance;
tomcat使用类加载器实例化Catalina对象,这样实例化的原因是什么呢? 使用不同类加载器是为了避免类冲突。下面用代码说明其中的原理。 假设我们有两个版本的同一个类 MyClass,分别位于不同的 JAR 文件中: mylib-1.0.jar 包含 MyClass 的第一个版本。 mylib-2.0.jar 包含 MyClass 的第二个版本。 我们希望在同一个 JVM 中加载这两个版本的 MyClass,并且它们互不干扰。
// MyClass 版本 1.0(位于 mylib-1.0.jar)
public class MyClass {
    public void printVersion() {
        System.out.println("MyClass version 1.0");
    }
}
// MyClass 版本 2.0(位于 mylib-2.0.jar)
public class MyClass {
    public void printVersion() {
        System.out.println("MyClass version 2.0");
    }
}
在同一个类加载器中加载两个版本的 MyClass,并尝试使用它们
import java.net.URL;
import java.net.URLClassLoader;

public class Main {
    public static void main(String[] args) throws Exception {
        // 创建一个自定义类加载器
        URL[] urls = {new URL("file:/path/to/mylib-1.0.jar"), new URL("file:/path/to/mylib-2.0.jar")};
        CustomClassLoader classLoader = new CustomClassLoader(urls);

        // 加载两个版本的 MyClass
        Class<?> myClass1 = classLoader.loadClass("com.example.mylib.MyClass");
        Class<?> myClass2 = classLoader.loadClass("com.example.mylib.MyClass");

        // 创建两个版本的 MyClass 实例
        Object instance1 = myClass1.getDeclaredConstructor().newInstance();
        Object instance2 = myClass2.getDeclaredConstructor().newInstance();

        // 调用方法
        myClass1.getMethod("printVersion").invoke(instance1);
        myClass2.getMethod("printVersion").invoke(instance2);

        // 演示类冲突
        System.out.println("instance1 instanceof MyClass: " + (instance1 instanceof com.example.mylib.MyClass));
        System.out.println("instance2 instanceof MyClass: " + (instance2 instanceof com.example.mylib.MyClass));
    }
}完整代码见仓库:https://gitee.com/jiajinliu/analysis_web_server.git
Server 启动过程
Server 的启动过程中用到了如下设计模式:
监听器设计模式
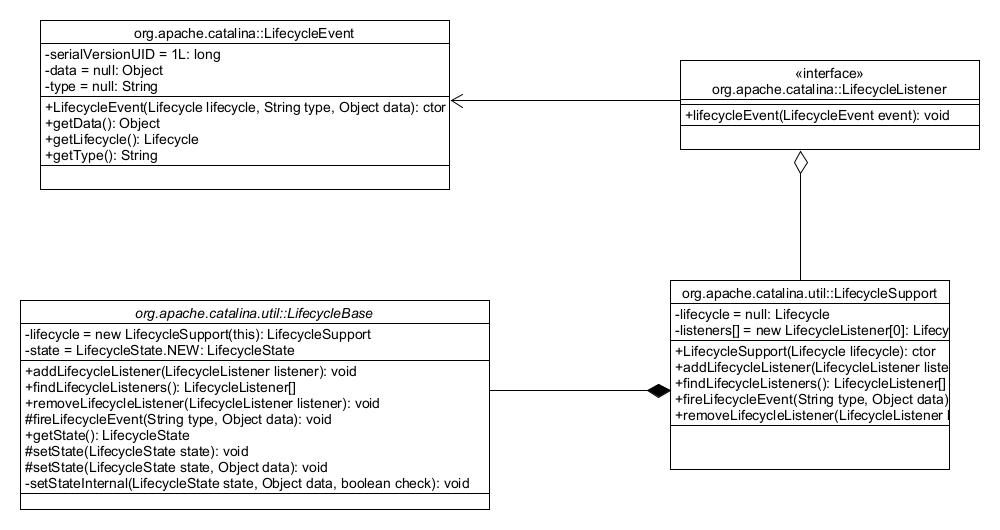
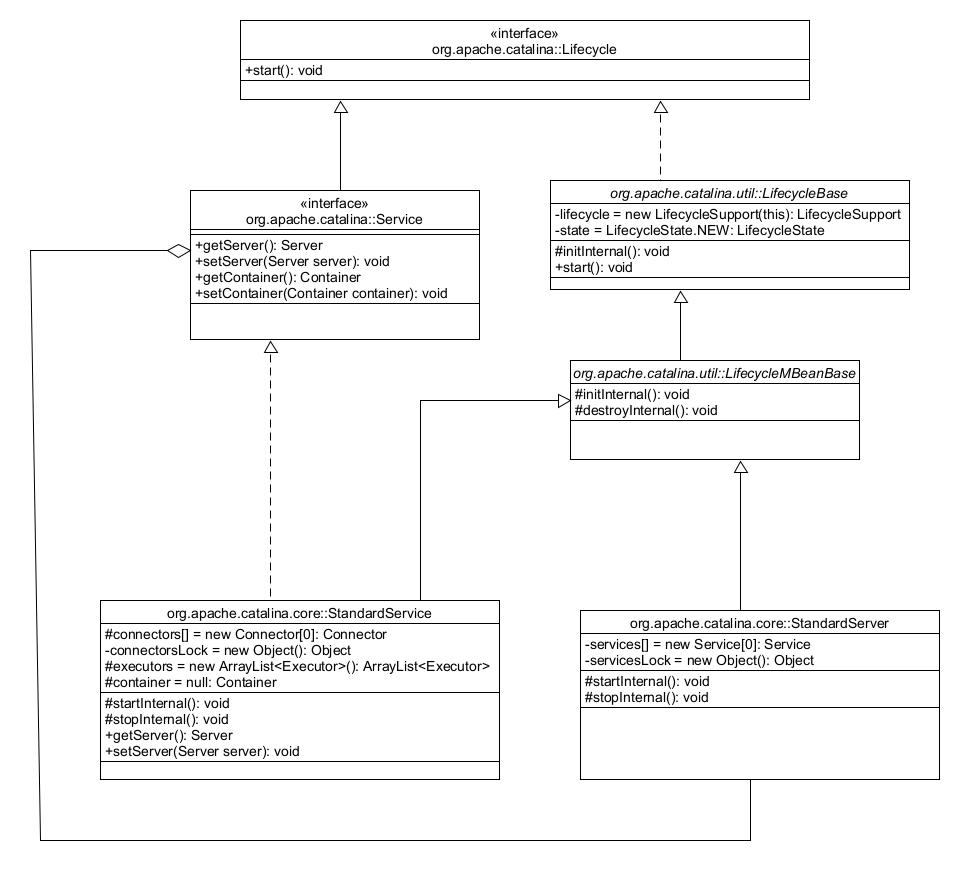
接口Server的实现类是StandardService ,这个类使用Lifecycle 接口和 LifecycleListener 接口共同实现了观察者模式。通过这种方式,StandardService 可以在状态变化时通知所有注册的监听器,从而实现灵活的事件处理机制。
模板方法设计模式
在抽象类LifecycleBase中实现了接口Lifecycle的start方法,确保启动过程中的顺序,启动过程由一系列的方法组成,其中一些方法是抽象的(startInternal),需要由子类实现。子类可以通过实现抽象方法来扩展具体的逻辑,而不需要修改模板方法。
Service 启动过程
Service 的分别启动 Connector 和 Engine。在启动时使用 synchronized 加锁处理,确保在多线程环境下,StandardService 启动 Container 和 Connector 时能够安全、正确地执行。
    @Override
    protected void startInternal() throws LifecycleException {
        if(log.isInfoEnabled())
            log.info(sm.getString("standardService.start.name", this.name));
        setState(LifecycleState.STARTING);

        // Start our defined Container first
        if (container != null) {
            synchronized (container) {
                container.start();
            }
        }

        synchronized (executors) {
            for (Executor executor: executors) {
                executor.start();
            }
        }

        // Start our defined Connectors second
        synchronized (connectorsLock) {
            for (Connector connector: connectors) {
                try {
                    // If it has already failed, don't try and start it
                    if (connector.getState() != LifecycleState.FAILED) {
                        connector.start();
                    }
                } catch (Exception e) {
                    log.error(sm.getString(
                            "standardService.connector.startFailed",
                            connector), e);
                }
            }
        }
    }
实验总结
通过阅读tomcat中 Server 和 Service 的启动过程,熟悉了类加载器的双亲委派机制,监听器和模板方法两种设计模式,使用synchronized锁确保在多线程环境下程序的正确运行。